How I use Obsidian as my portfolio CMS
Explaining how I built my site CMS with Obsidian, a markdown note-taking app, including tricks to efficiently fetch content and optimize attachments.
Hello all! I finally have enough motivation to create my own portfolio website. I'll use this blog as a place to practice my writing skills and also to improve my English.
For this first post, I'll explaining how I use Obsidian as this site CMS
#Obsidian?
For those who don't know, Obsidian is a free to use markdown-based personal knowledge base and note-taking application.
##Why Do I Use Obsidian?
I know there are alternative like Notion that support database and integration, but there are some reason that I actually move to Obsidian.
- I'm not a big fan of block based editor, it is faster to write markdown file instead of using slash command to insert an element type.
(ex: for creating heading, it is faster to write# This is a headinginstead of/head > enter > write the heading) - Extendable, obsidian have a lot of community plugins that could help to extend your obsidian vault. They also provide a documentation about how to create your own plugin.
##My Obsidian Vault
If you want the exact copy of my obsidian settings, you can copy my vault repo since it's also include all of the obsidian settings.
###Obsidian Plugins, A way to Upgrade Your Note-taking Experiences
There are a lot, i mean a looooot community plugins that could help your productivity or even experiences while using Obsidian.
Here are a list of obsidian plugins that I use:
Here are a list of obsidian plugins that I use:
| Plugins Name | Why did I use it? |
|---|---|
| Advanced Tables | This plugin help me formatting, editing, and navigating through table. With this plugin, I can easily reorder, sort, align the table by a simple click or drag n drop. |
| Banners | This will add banner on top of the notes, the images you see on top of this notes are based on this banner. I can also fine-tune the position by adding X and Y offset on the frontmatter. |
| Commander | With this plugin I can add custom command shortcut to Obsidian UI. Like run a templater command, git push button, I also can create a macro to combine multiple shortcut. |
| Git | If you're an dev, 99% of you must have already using it. If you don't, it is a version control system that track changes in files. |
| LanguageTool Checker | I've been using LanguageTool in my browser to help me check my email before sending it. It's helping me a lot since English isn't my native language. |
| Linter | This plugin could format headings, footer, paragraph, and many other things. I'm using this to make sure all my notes were consistent. |
| Natural Language Dates | Working with date and times isn't fun. With this plugin, I could easily insert time by using command like @@today or @@yesterday or even something like @@2 weeks ago. |
| Omnisearch | A fuzzy search plugin to find anything I've write before. I've been using it on my uni-notes vault and it's really helpful when I need to find something that I don't even remember where i put it. |
| Paste Image Rename | By default, Obsidian will name the attachment as Pasted images bla bla.This plugin will change it automatically with the notes name or ask you the new name. |
| Style Settings | This plugin will let you controls and adjust theme, plugin, and many other things. |
| Templater | Templater really useful if you have note that should follow certain template. It also can run a javascript inside. I'm using this plugin to create a prompt when I create a new note, and also for build post index. |
| Update Time on Edit | Automatically update updated_at metadata on frontmatter when saving. |
###Folder Structure, Keep Thing Organized
I'm simplifying the folder structure so it have less folder / files.
| Folder / File | What is this? |
|---|---|
| /attachments | All the attachments like image, file, or any other media are saved on this folder. |
| /posts | All posts are inside this folder, it contains 2 categories which is articles and projects. |
| /scripts | For now it's contains script for build posts index. Might be adding more in the future when I need it. |
| /templates | Templater file. Will run these file when creating a new note or build posts index. |
| index.json | Generated posts index, It will be used for listing or searching posts on site. |
| index.min.json | Minimized posts index. |
#Integrate the Notes into My Site
After explaining about Obsidian, now I will now explaining how I add it into my site.
I will use
I will use
octokit to get all the data from the posts repository to show it on the site repository.This section will be separated into 2 parts:
- Getting the notes
- Handle attachments
##Getting the Notes
The notes will be displayed in 2 different way:
- Summarized, that will be displayed on posts list. It will only show the basic data from frontmatter.
- Detailed, that will be displayed the full content of this notes, include data from frontmatter and the notes content itself.
At first I think I could simply query the folder using
octokit and render the content.const data = await octokit.rest.repos.getContent({
owner: 'mbaharip',
path: 'posts/{{ post type }}/{{ post slug }}',
repo: 'mbaharip-blog-posts'
})
While it work best on post page, it doesn't work well if I want to get the summarized content.
Why it doesn't work well? It has problem on 3 things:
Why it doesn't work well? It has problem on 3 things:
- Response time
- Sorting
- Search / Filter
So now we need to fix all these problems.
By fetching the notes folder, the response from
 Basic fetching using octokit
It will work good enough IF I only want to show file name on posts list.
But there's no way I could Filter, or Sort the posts since all the metadata is inside the hashed content which can only be retrieved by sending a request to the file path.
octokit that I could use only name, and path. (Get content repository documentation)Preview
It will work good enough IF I only want to show file name on posts list.
But there's no way I could Filter, or Sort the posts since all the metadata is inside the hashed content which can only be retrieved by sending a request to the file path.
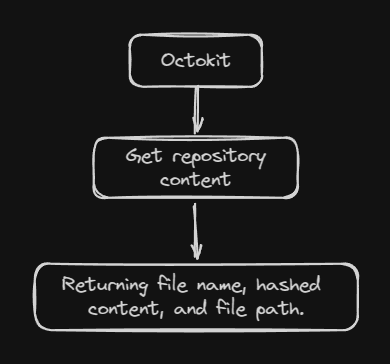
"Why don't I loop every files, and get the contents of the note?"
I've tried that too inside Next.js route handlers, while it works the response time are not great which is become the problem.
 Looping problem
For 3 notes that I test, it took 1.5s - 2s to complete the request. Imagine if I have a lot more than that?
Not only that, but it also send 4 requests via GitHub Rest API, and for authenticated users they gave us 5000 requests limit per hour.
So I scrap this one, and trying to find a new way to get all the notes that more efficient.
Preview
For 3 notes that I test, it took 1.5s - 2s to complete the request. Imagine if I have a lot more than that?
Not only that, but it also send 4 requests via GitHub Rest API, and for authenticated users they gave us 5000 requests limit per hour.
So I scrap this one, and trying to find a new way to get all the notes that more efficient.
"Why don't I create a single file that contains all the notes with it's metadata?"
With this I could fetch a single file, and parse the content to get all the notes with it's metadata.
With this I could fetch a single file, and parse the content to get all the notes with it's metadata.
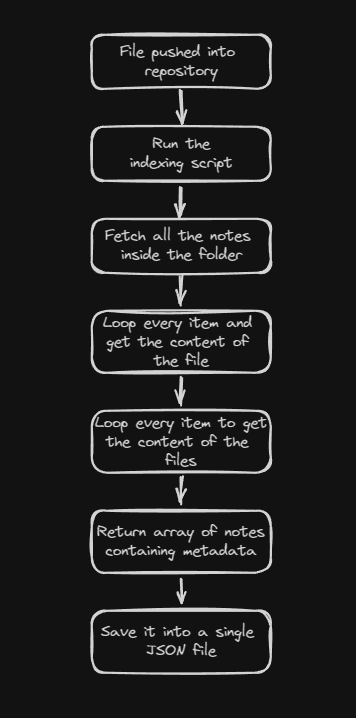
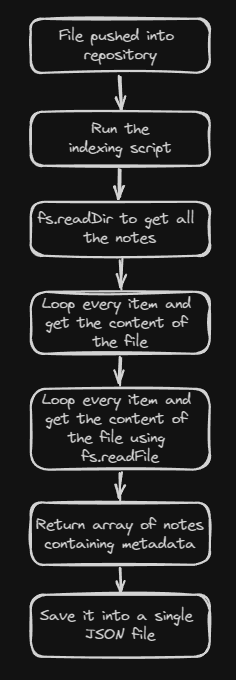
For old website, I'm using GitHub workflow to run a script whenever I push a new note into the repository.
Since I've updated the script, I'll explain all the changes from the old script to the new one.
Since I've updated the script, I'll explain all the changes from the old script to the new one.
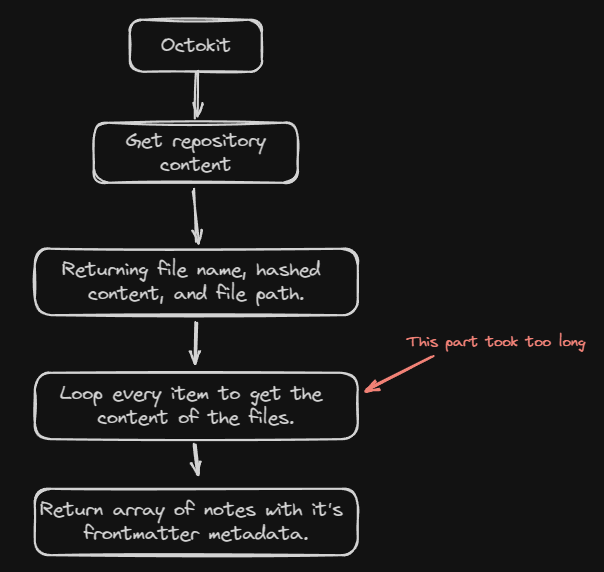
###Script #1 - The Base of the Indexing Script
For the first script I actually just copying the previous code from Next.js route handler into a singular javascript files, and then output the result into a JSON file.
 Script #1 overview
It still takes time, but hey.. it's only happen once when I push the note.
After the JSON file is created, I can fetch it with around 300 - 500ms response time, and I also can search by tags and sort it.
Preview
It still takes time, but hey.. it's only happen once when I push the note.
After the JSON file is created, I can fetch it with around 300 - 500ms response time, and I also can search by tags and sort it.
###Script #2 - Improve the Speed of Indexing
After trying to push couple of test notes, I noticed the indexing speed would take a long long time.
I discussed this problem with couple of my friends, and 1 of my friends told me that "Why don't I use
I discussed this problem with couple of my friends, and 1 of my friends told me that "Why don't I use
fs instead of octokit?"So I tried to rewrite the script and replace the
 Script #2 overview
Thanks to this, it actually improve the speed a lot, from 2 - 3 seconds to only around 30ms.
octokit with fs.Preview
Thanks to this, it actually improve the speed a lot, from 2 - 3 seconds to only around 30ms.
###Script #3 - Simplify the Script and Add Type Safety
Since the summarized post on new site are more simple than previous one, I could remove couple metadata from the output (like summary, thumbnail, and thumbnail offset).
Now both articles and projects JSON file since I don't think I need to separate it.
Now both articles and projects JSON file since I don't think I need to separate it.
I also move the script execution on local before pushing into GitHub.
Since if I run the execution on GitHub, I need to pull whenever I need to make an edit since it will generate new index on the GitHub instead of local.
Since if I run the execution on GitHub, I need to pull whenever I need to make an edit since it will generate new index on the GitHub instead of local.
Here are the difference between the old JSON and the new JSON:
type IndexedPost {
	title: string;
	slug: string; // New
	// summary: string;
	type: 'article' | 'project'; // New
	tags: string[];
	// thumbnail: string;
	// thumbnail_x: number;
	// thumbnail_y: number;
	created_at: string; // Renamed
	updated_at: string; // Renamed
	// path: string;
}
###Problem Conclusion
By generating an Index JSON file, I could resolve all the problems I have while getting the notes.
Performance? It's a lot faster since I only need to fetch a single file.
Sorting? No problem since we have
Filtering? Now I can filter the post based on
Performance? It's a lot faster since I only need to fetch a single file.
Sorting? No problem since we have
created_at and updated_at data inside of JSON file.Filtering? Now I can filter the post based on
name, type, or even tags.But it's not done yet, since we need to create a handler for the attachments.
##Getting the Attachments
Same as previous section, I will separate this into 2 parts.
- How to get the attachments file
- How to use it inside the page
###Getting the Attachment
There actually no fancy thing here.
I simply get the attachment file name, and add it into
I simply get the attachment file name, and add it into
octokit query path.But what if I use external links instead of local attachment file?
Easy, I just need to add a guard check if it contains
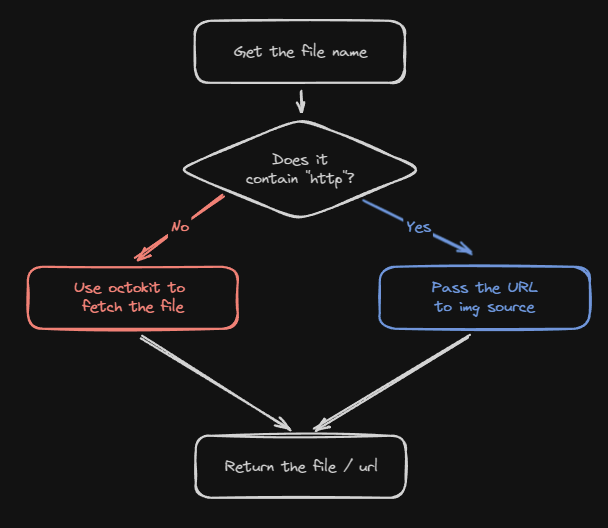 External link guard check
Easy, I just need to add a guard check if it contains
http or not.Preview
###How to Render it on the Page?
There are remarks extension that could help you parsingwikilink.
Just found out about this after I implement my own solution.
Stupid me just found out that I can use markdown link instead ofwikilinkinstead from settings.
It is onSettings>Files & LinkssectionBut I'll keep this section for reference
Since Obsidian are using
My solution to this problem is by taking the markdown content, then simply replacing all the
wikilink tag, I need to convert it to markdown tag first before I can actually use it.My solution to this problem is by taking the markdown content, then simply replacing all the
wikilink tags with markdown tags.import matter from 'gray-matter';
/**
* Fetch raw content logic goes here
*/
const markdownData = matter(rawContent);
const {content, data} = markdownData;
let formattedContent = content;
/**
* Check if there any line breaks between the content and metadata
* Since gray matter splitting the metadata by '---', the content might have line breaks.
*/
if(formattedContent.startsWith('\n')) markdownContent = markdownContent.slice(1);
/**
* Replace all wikilink image into markdown image
*/
markdownContent = markdownContent.replace(
/!\[\[([^\]]+)\]\]/g,
''
);
###Extra: Optimizing Image Attachment
Heavy images is not a good thing for blog post, especially if you're strict about core web vitals.
Uncompressed image will affect your Largest Contentful Paint (LCP) measurement, and also it will take a lot of time to load if the user have bad internet connection.
Uncompressed image will affect your Largest Contentful Paint (LCP) measurement, and also it will take a lot of time to load if the user have bad internet connection.
The easiest way to optimize image is using Next.js Image component, but you can only optimize 1000 images when deploying it to Vercel.
You can also build a Cloudflare Worker to resize the image, and cache it.
On this section I will explain how I optimizing the image on this site using Next.js route handler.
With using Next.js route handler it won't affect your Image Optimization quota on Vercel, but will affect thing like Function Execution and Invocation.
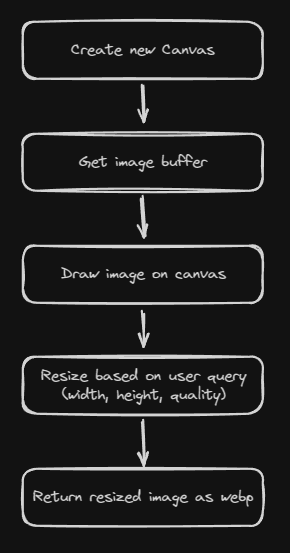
####Trying node-canvas
Since it will running on Serverless Invocation, I can't use canvas.
Some people on GitHub are recommending to use this library instead.
If you have used canvas, it should be easy to use this library.
 Optimizing image using node-canvas
The flow are quite simple and it run smoothly on my local machine.
Some people on GitHub are recommending to use this library instead.
If you have used canvas, it should be easy to use this library.
Preview
The flow are quite simple and it run smoothly on my local machine.
But when I tried to deploy it to Vercel, it would throw a runtime error.
Some people on GitHub also get the same error, but I couldn't find any fix to this.
So I give up using this library.
libuuid.so.1: cannot open shared object file: No such file or directorySome people on GitHub also get the same error, but I couldn't find any fix to this.
So I give up using this library.
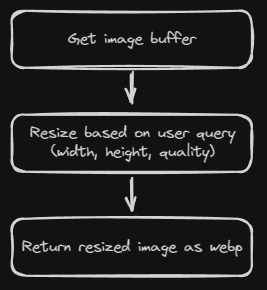
####Sharp to the Rescue
With swapping
I don't need to create a new Canvas, draw the image, or all the hassle with resizing the image.
node-canvas to sharp, I could make the code shorter.I don't need to create a new Canvas, draw the image, or all the hassle with resizing the image.
By using
 Optimizing image using sharp
sharp, all you need to do is create new sharp instance with image buffer, call resize method if there any user query, then return it as webp file.Preview
It work perfectly, it compressing the
There are ~100ms spike on response time, but we save around ~95% of the bandwidth.
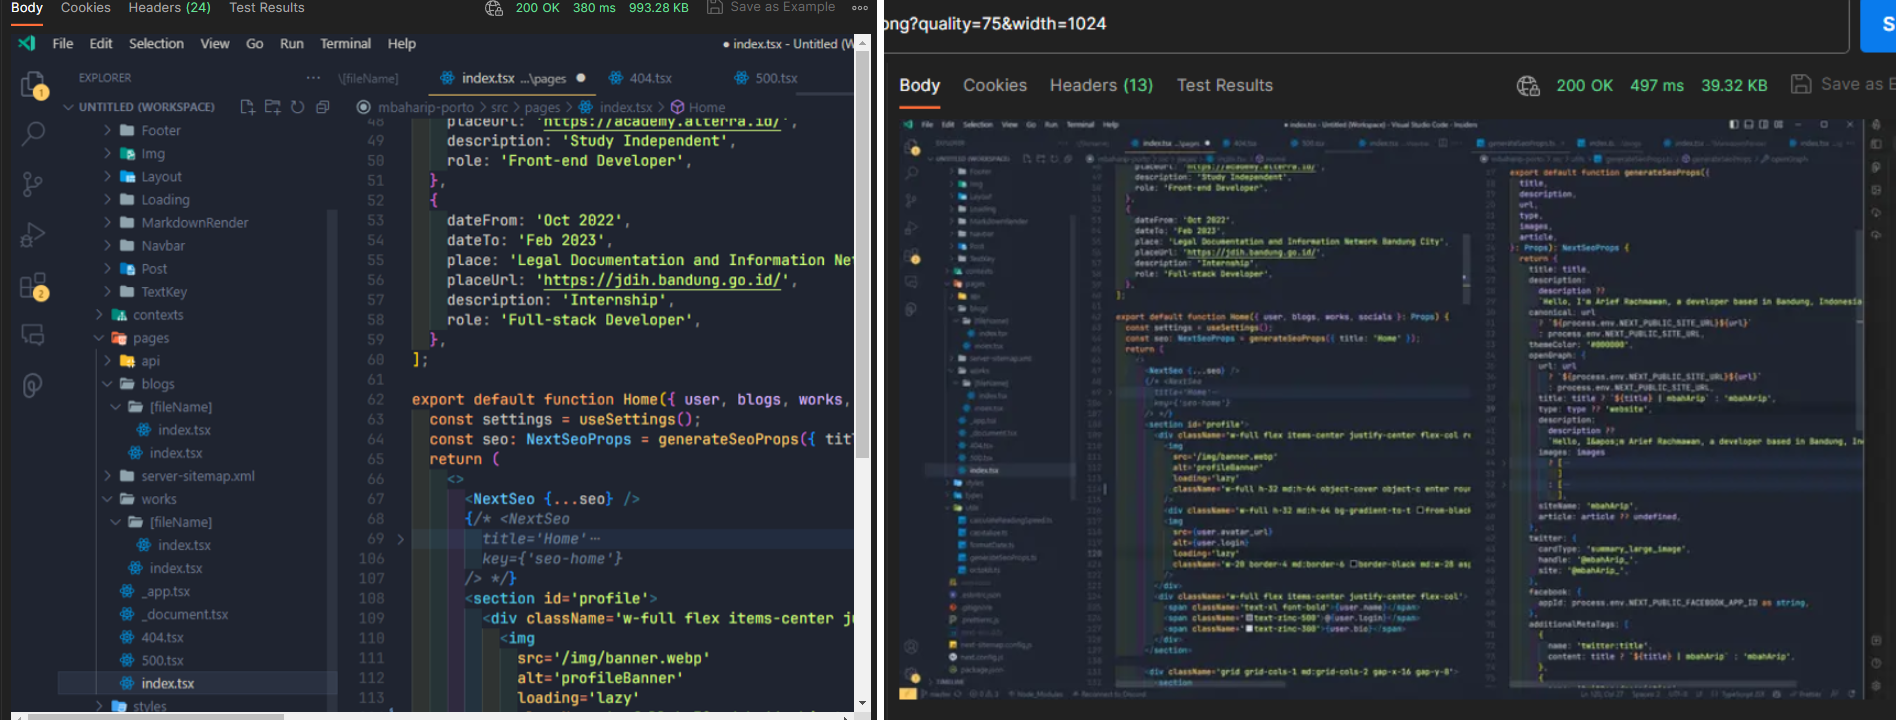 Left: Uncompressed PNG image | Right: Compressed WEBP image
993KB image to only 40KB on 1024px width resolution and 75 webp quality.There are ~100ms spike on response time, but we save around ~95% of the bandwidth.
Preview
Now I can use this optimized Image on posts thumbnail or banner.
##Transforming the Content
Now I have solve the issue with fetching the content, and the attachments. While I can use it as it is and let
For example in this note, the Table of Contents are marked by
react-markdown render it, there are times where I need a custom component to render.For example in this note, the Table of Contents are marked by
{{ data-toc }} inside the markdown, or how I turn a blockquote element into Alert component.###Render the Table of Contents
For the table of contents, I simply replace the section to a
I separate the content into an array with this zod schema:
Collapsible components with links inside.I separate the content into an array with this zod schema:
const Schema_PostContent_Item = z.object({
		type: z.literal("markdown"),
		content: z.string()
	}).or(
		z.object({
			type: z.literal("toc"),
			headings: z.array(
				z.object({
					id: z.string(),
					text: z.string(),
					level: z.number().min(1).max(6)
				})
			)
		})
	);
const Schema_PostContent = z.object({
	slug: z.string(),
	content: z.array(Schema_PostContent_Item)
})
And then split the content by
{{ data-toc }}, to fill the content array.const content_data: z.infer<typeof Schema_PostContent> = {
slug: post.frontmatter.slug,
content: []
}
// Check if data-toc exists inside the post
if(post.content.includes("{{ data-toc }}")) {
// This would return array with 2 items, Introduction section, and Content content section
const [introduction, content] = post.content.split("{{ data-toc }}");
// Extract headings from the post
const headings = content.match(/^(#+)\s(.+)$/gm);
const toc = headings?.map((heading) => {
const level = heading.match(/^(#+)/)![0].length;
const text = heading.replace(/^(#+)\s/, "");
const id = text
.toLowerCase()
.replace(/[^\W\s]/gi, "") // Remove all symbols
.replace(/\s/g, "-") // Replace all space with hyphens
.replace(/-+/g, "-"); // Remove double hyphens
return { id, text, level };
})
content_data.content.push({
type: "markdown",
content: introduction
});
content_data.content.push({
type: "toc",
headings: toc || []
});
content_data.content.push({
type: "markdown",
content: content
})
} else {
content_data.content.push({
type: "markdown",
content: post.content
});
}
// Type checking, if the value of content_data not satisfy the schema, it will return an error
Schema_PostContent.parse(content_data);
// Render the markdown
return (
<Space direction="vertical">
{content_data.content.map((item, index) => {
switch(item.type):
case "markdown":
return <Markdown key={index}>{item.content}</Markdown>
case "toc":
return <ToC items={item.content} />
default:
return null
})}
</Space>
)
###Using remark-directive
For other thing that I need to render as components, I will use
This will let me add attribute to the element I want to render, then check on
remark-directive plugin.This will let me add attribute to the element I want to render, then check on
react-markdown to render what components when it have the attribute.For example, I will render an
Alert component instead of blockquote if I have data-slot attribute.:::blockquote{slot="info" title="Notice"}
The content of the alert component
:::
In the
react-markdown component, I could add checking to render.<ReactMarkdown
components={{
blockquote: ({children, ...props}) => {
if(props.slot) {
return <Alert message={children} type={props.slot} />
}
return (
<blockquote {...props}>
{children}
</blockquote>
)
}
}}
/>
Here are the result
Notice
This is a normal blockquote using markdown format
#Conclusion
The reason I use Obsidian as my site CMS is because it's using markdown, which I familiar with, and also it is extendable with community plugins.
I have couple problems while implementing this into my website such as:
I have couple problems while implementing this into my website such as:
- I can't filter notes / articles
- I can't sort the notes / articles
- Response time problem
- How to handling attachment
- Attachment not optimized
To solve the first 3 problems, I decided to create a posts index JSON which contains an array of posts metadata.
This index JSON file need to be generated before I push the notes to repository.
With this file I can speed up the response time since I only need to fetch 1 file instead of looping through each notes, and also I could search for keyword, and also sort the notes.
This index JSON file need to be generated before I push the notes to repository.
With this file I can speed up the response time since I only need to fetch 1 file instead of looping through each notes, and also I could search for keyword, and also sort the notes.
About how to handling attachment, I can simply get the attachment name then fetch the attachment using
To optimize the attachment, I'm using
octokit, and render it into the page.To optimize the attachment, I'm using
sharp to resize the attachment and convert it to webp. With this I could compress the size of the image up to ~95%.Thank you for reading my long first post.
Hope this post can inspire you.
If you have any question or want to point out something I did wrong, feel free to leave a comment!
Hope this post can inspire you.
If you have any question or want to point out something I did wrong, feel free to leave a comment!
Previous
No more posts
Next